Windows XP Tips and Tricks PAGES

HOME       2      3      4      5      6      7      8      9      10      11

Repairing|Troubleshooting

Useful Run Commands

Useful Keyboard Shortcuts

Sunday, February 22, 2009

Using the Windows Key-Windows Xp Tips and Tricks-Windows Xp Tips and Tricks

Using the Windows Key 

The Windows logo key, located in the bottom row of most computer keyboards is a little-used treasure. Don't ignore it. It is the shortcut anchor for the following commands: 

Windows: Display the Start menu
Windows + D: Minimize or restore all windows
Windows + E: Display Windows Explorer
Windows + F: Display Search for files
Windows + L: Lock the workstation
Windows + M: Minimize all windows
Windows + Q: Quick switching of users (Powertoys only)
Windows + Q: Hold Windows Key, then tap Q to scroll thru the different users on your pc 
Windows + R: Display Run dialog box
Windows + U: Open Utility Manager
Windows + Ctrl + F: Display Search for computer
Windows + F1: Display Help and Support Center
Windows + Pause/ Break: Display System Properties dialog box
Windows + Shift + M: Undo minimize all windows
Windows + Tab: Cycles through all open programs and taskbar buttons. Press [ENTER] to select.

Protect your data during a power outage-Windows Xp Tips and Tricks-Windows Xp Tips and Tricks

Protect your data during a power outage

I'm sure that many of you have been victims of data loss due to a power outage. In some cases, devastated by this event. Most people that need certain safe guards from power outages use a Uninterruptible Power Supply (UPS). It used to be that a UPS would only be used at places such as data centers or critical business applications. Since the cost of a UPS has come down considerably over the years, this is now a cost effective solution for personal computers too. 

A UPS is nothing more than a battery backup. So, knowing that the UPS is giving you 'battery' power during a power outage, you know that you are not going to be able to continue working on your computer, but you will have enough time to save the work that you've already started. That is its sole purpose. 

If you have unsaved data and are away from your computer during a power outage, you can configure your 'Power Option' settings to ensure that your computer will go in to Hibernate mode before the battery backup power is gone. Once a computer enters Hibernate mode, it takes all of the data that is in memory and stores it on your hard drive. Here is how to configure this setting:

Go to Start>> Control Panel>> Performance and Maintenance>> Power Options.

In Power Option Properties, select the Hibernate tab.

Place a checkmark in the checkbox titled: Enable hibernation. Click Apply

Click the Power Schemes tab.

In the Power Schemes drop down menu, select Max Battery from the list.

In the "System hibernates" category, select a time that is less than your maximum backup battery life. Click Apply 

Exit all windows.

Capture a Windows Screen-Windows Xp Tips and Tricks-Windows Xp Tips and Tricks

Capture a Windows Screen

If for whatever reason you would like to capture what is on your computer screen, Windows makes this task easy. here's how: 

Press the Printscreen (prt scr) key. This will place a digital image of your screen on to the clipboard.

Open any image editing software such as:

Paint
Word
PowerPoint
Select Edit and Paste

The image will now be available to edit. From here you can print it, save it to a file or post it to the Web like the screen capture below.

Reinstall the Windows games-Windows Xp Tips and Tricks-Windows Xp Tips and Tricks

Reinstall the Windows games

Follow the instructions for your version of Windows. Unless you have the Windows installation files on your hard drive, you will need your Windows installation CD. 

To reinstall Windows games in Windows XP and 2000 

On the Windows taskbar, click Start > Settings > Control Panel > Add or Remove Programs.

Click Add or Remove Windows Components. 

Select Accessories and Utilities, and then click Details. 

Select Games, and then click Details. 

Uncheck all games. 

Click OK on any open window. 

Click Next on the Windows Component Wizard window. 

When the process finishes, click Finish. 

Repeat steps 1-8, this time rechecking the Games check box. 

To reinstall Windows games in Windows 98, 95, and Me 

On the Windows taskbar, click Start > Settings > Control Panel > Add/Remove Programs. 

On the Windows Setup tab, double-click Accessories. 

Uncheck Games. 

Click Apply, and then OK to close any open windows. 

When the process finishes, repeat steps 1-4, but this time recheck the Games check box.

Microsoft Narrator-Windows Xp Tips and Tricks-Windows Xp Tips and Tricks

Microsoft Narrator 

Microsoft narrator is an accessibility option to assist the hearing impaired. To activate this feature: 

Select Start, Programs >> Accessories >>Accessibility >>Narrator. (Or press the Windows key plus the letter "U" to open the Utility Manager.)
Once you've read through the intro screen (or let the Narrator do it), click OK.
You'll now see a dialog box of Narrator options. 

Assuming you want to leave Narrator running, select the desired options, then minimize its dialog box. And if you've opened the Utility Manager, feel free to close it.
To turn Narrator off, click the Exit button or right-click its taskbar item and select Close.

Uninstall Windows Updates-Windows Xp Tips and Tricks-Windows Xp Tips and Tricks

Uninstall Windows Updates

Method #1

Windows Update is a very important tool that serves to protect or improve upon your computers functionality. In some cases, you may encounter problems due to an update that did not install correctly. If this happens, here is how you can uninstall the update package:
Go to Start>> Control Panel>> Add or Remove Programs
Select the Change or Remove Programs button
Locate the offending update, click it to highlight it, then click the Change/Remove button

If it is an updated device drive that is causing the problem, here's how you can uninstall the updated driver and go back to the previous one.
Go to Start>> Control Panel>> System
Click the Hardware tab
Select Device Manager
Double click the offending device
Click the Driver tab
Select Roll Back Driver

Method #2

Using System Restore, you can quickly and easily take your system back to a restore point before installing the update. Here's how:
Go to Start>> All Programs>> Accessories>> System Tools>> System Restore
Tick the task that states "Restore my computer to an earlier time"
Click Next, then follow the onscreen instructions

Make a backup copy of your Windows XP Registry-Windows Xp Tips and Tricks-Windows Xp Tips and Tricks

Make a backup copy of your Windows XP Registry

Many of the tips and tricks here at 5 Star Support require editing the Windows Registry. In this tip, I will show you the correct way to perform a backup of your Windows Registry so that you can safely restore your systems registry files in the event something goes wrong. 

Go to Start>> Run. Type in: regedit [Enter] or click OK.

Once in the Registry Editor, choose File from the toolbar.

Select Export

In the resulting Export Registry File window (click image below), locate the "Save in:" selection menu. Choose a location for this file that will be easily found if needed. 

Name the file whatever you would like (I use the days date) in the "File name:" text box. 
At the bottom of the window you will see the Export Range category. Tick the "All" selection.

Click the Save button.

Monitor USB Bandwidth Usage-Windows Xp Tips and Tricks-Windows Xp Tips and Tricks

Monitor USB Bandwidth Usage

USB devices such as; digital cameras, mice, flash drives and keyboards all share the same bandwidth allocated by Windows. The Windows XP USB user interface does not support more than 10 host controllers. When the bandwidth reaches the 100% allocation, you will receive a "Stop Error 0x0000007E" message. 

To check the bandwidth usage:

Go to Start>> Right click on My Computer.

Select Properties>> Hardware>> Device Manager

Once at the Device Manager, double click "Universal Serial Bus Controllers", then double click the first USB Root Hub listing .

In the resulting window, select Advanced.

Saving Space-Windows Xp Tips and Tricks-Windows Xp Tips and Tricks

Saving Space

All Windows Operating Systems have a folder on the hard drive where various applications temporary files are stored. On occasion, it is a good idea to relieve your hard drive of these unneeded files. There are a couple different ways you can find these files:


1. Open Windows Explorer and in the Address field type: %temp% (including the percent signs) [Enter]. You will then be taken to that folder. 
2. Click Start>> Run, and type: %temp% [Enter] Any of these temporary files that are found using the above methods are safe to delete. 

Note: Sometimes the files are still in use, so deleting them works best immediately following a reboot.

Full Screen feature-Windows Xp Tips and Tricks-Windows Xp Tips and Tricks

Full Screen feature

The Windows Full Screen Feature is very helpful when you are in search of a file within a very large folder. For instance, when you open your My Documents folder, press the F11 key on your keyboard to activate the Full Screen Feature. This will make the whole folder viewable within the screen instead of having to scroll down in search of your file. To revert back to your regular screen, just press the F11 key again.

Quickly Close All Windows-Windows Xp Tips and Tricks-Windows Xp Tips and Tricks

Quickly Close All Windows

If you have several windows open and you would like to close them quickly, you can hold down the CTRL button while clicking each taskbar button. With all of the buttons selected, right click the last button clicked and select "Close Group" (see illustration below).

Launch the On-Screen Keyboard-Windows Xp Tips and Tricks-Windows Xp Tips and Tricks

Launch the On-Screen Keyboard

Microsoft's on-screen keyboard utility is a virtual keyboard that allows people with mobility impairments to use the on-screen keyboard via a mouse or joystick.


To access the on-screen keyboard:

Go to Start>> Run. Type in: OSK [Enter] or click OK.

The on-screen keyboard will now be displayed at the bottom of your screen. You can move it anywhere you would like just as you can with any other window.

Once you have the on-screen keyboard displayed, you can click the "Keyboard" button and select the type of keyboard to be displayed

Then, click the "Settings" button to select the mode you would like it to operate in.

Installing Fonts-Windows Xp Tips and Tricks-Windows Xp Tips and Tricks

Installing Fonts 

Windows comes with a great deal of different fonts selections, but there are those of you that need more. Windows makes it easy to add new fonts to your system. 

Once you have downloaded your font of choice: 

Go to Start>> Control Panel.

Double-click the Fonts icon. If the Fonts icon is not visible, you may need to click Appearance and Themes first. Then go to "See Also" in the upper left of your screen.

Once you get to your Fonts window, you can either drag and drop your new font from its downloaded location into the Font window or, you can click on the File menu in the upper left of the Fonts window and select "Install New Font...". From here, you can browse to the new font location, click the font file and click OK. The font will automatically be copied into your Fonts folder.

Your new font will now be available for all Windows applications to use.

Access your favorite programs fast-Windows Xp Tips and Tricks-Windows Xp Tips and Tricks

Access your favorite programs fast

Windows makes it possible to access your favorite programs with a keyboard command. This is very helpful when you have a window open and you need to access a certain program quickly and you don't want to go to your desktop to access it. Here's how to set this up:

Right click any program, either in All Programs or on your Desktop.

Select Properties from the resulting menu.

Click the Shortcut tab. 

In your programs Properties window, you will find the word "None" list in the Shortcut key text box. 

Click once inside this text box and choose a letter on your keyboard that you would like to associate with your program (see Figure #1). In my case I chose the letter "F". Windows will automatically insert Ctrl + Alt + F into the text box making this your new keyboard shortcut command.

Click Apply and exit the Properties window.

Now whenever I use Ctrl + Alt + F on my keyboard, the chosen program will automatically launch.

Windows XP ClickLock Feature-Windows Xp Tips and Tricks-Windows Xp Tips and Tricks

Windows XP ClickLock Feature

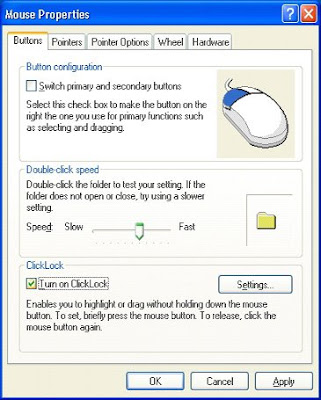
If you are doing a lot of drag and drop of files and folders, you may want to consider using the ClickLock feature available in Windows XP. With this feature activated, you can left click and hold the click for a determined amount of time until the item that was clicked is locked. Then just release the left click and move your mouse to the location where you would like to drop the item, left click again and it will be dropped in to this new location. Here is how to activate the ClickLock feature:


Go to Start>> Control Panel>> Mouse Icon. You will then see the illustration shown below. In the Mouse Properties window, click the "Buttons" tab. Then, place a check mark in the little check box titled "Turn on ClickLock". Once this is checked it will activate the "Settings" button. By clicking the settings button, you will be able to control the speed in which it takes Windows to lock on to the selected item. It defaults in the center position and in most cases, this is fine.

Windows XP Tips and Tricks PAGES

HOME       2      3      4      5      6      7      8      9      10      11
Powered By Blogger